Weekender
An escape from monotony
Roll out your yoga mat and reap the benefits from easy-to-do Surya Namaskara.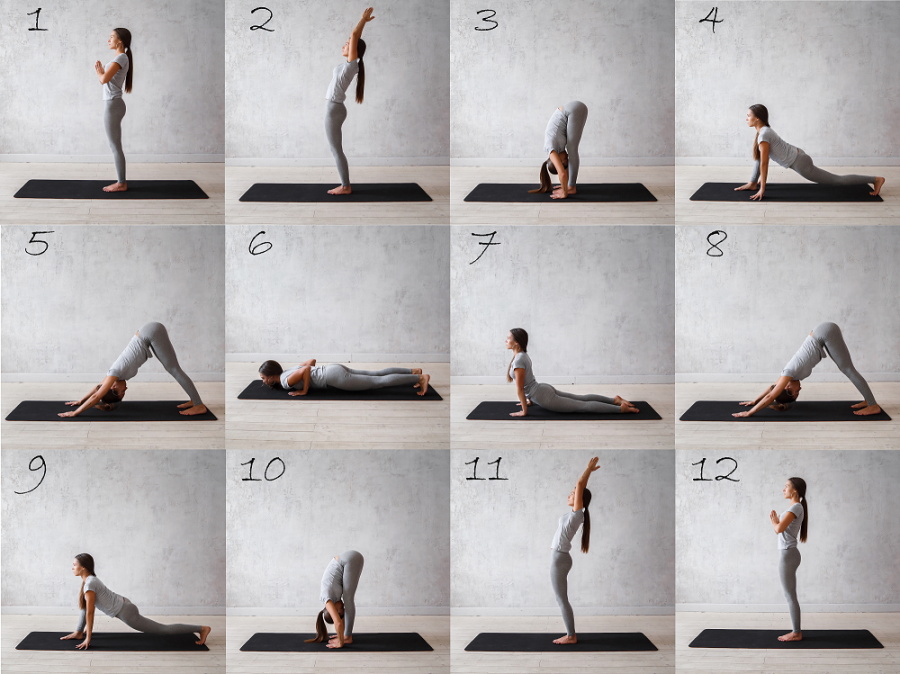
Pooja Lakhey
Any online search for yoga classes today reveals yoga’s skyrocketing popularity. As we’re confined to a boundary of just our house, there’s never been a better time to take a deep breath and do some stretching. Even beginners or those who have never tried yoga at all can start taking baby steps without the fear of being surrounded by pros confidently launching into handstands.
“There are mainly two types of yoga—Hatha Yoga and Astanga Yoga. Hatha yoga starts off with physical postures that eventually lead you to a better meditation practice, whereas Ashtanga first focusses on self, and then moves on to physical postures and meditation,” says Kriti Karki, owner and lead instructor at Mandala Studio Yoga & Spa.
Yoga is very welcoming of all levels of learners because the strengthening effects of yoga asanas are achieved gently and gradually, without pushing or forcing, allowing one to take it in one’s own pace. Also, practising yoga requires bare minimum—a mat and a cushion. Just as you don't need much equipment to do yoga, you don't need much space either. Try to find a room where you won't be disturbed during your practice and that’s it.
So, if you want to stay fit beyond the physical level, follow these easy steps provided by Kriti to master Surya Namaskara, the ultimate yoga flow that serves as the foundation for all other yoga poses, at home.
Step 1: Prayer Pose (Pranamasana)
So the first thing Kriti suggests is to stand with your feet hip-width apart, especially if you’re new to yoga. You don’t even need to have the toes touching. Though some might say that the toes are meant to touch, it’s better to have the feet hip-width apart and parallel, spreading through the toes.
Step 2: Raised Arms Pose (Hastottanasana)
So on the in-breath, because everything in yoga is related to the breath, stretch the arms up over your head.
Take the arms about 45 degrees instead of making the palms touch because that can squish the shoulders up towards the ears. To prevent that from happening, simply keep your arms and hands separated.
Step 3: Standing Forward Bend (Hasta Padasana)
On the out-breath, fold forward. You don’t have to touch the floor. You could even just hold opposite elbows as you hang down. If you need to, allow for a slight bend in the knees just so that your spine can hang towards the floor.
Step 4: Standing Half Forward Bend (Ardha Uttanasana)
On the in-breath, come up to a flat back. Place your hands on the upper part of your shins or even your knees, if needed. The point is to allow your spine to lengthen forward. Imagine someone gently pulling your shoulder blade back towards your tailbone and another person gently pulling your skull out in front of you.
Step 5: Plank Pose/Staff Pose (Dandasana)
From the flat back, step back into plank pose. It is advised to lead with your left foot, but you can choose whichever foot you’d like to lead with. It’s probably best to alternate which foot you lead within your yoga practice.
If it’s too much for you, you can drop your knees to the floor. Just be sure that your knees, hips, and neck are all aligned in a straight line.
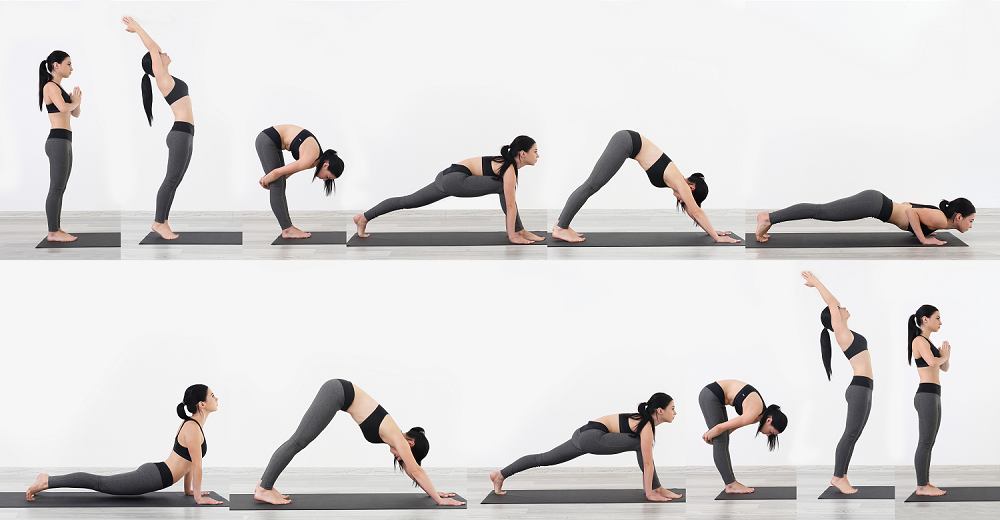
Step 6: Salute With Eight Parts (Ashtanga Namaskar)
This pose is tricky, but it’s essential to properly bring you from plank pose to cobra pose.
Bend the knees and gently bring them to the floor (if they aren’t already there) and move the hips back slightly. Slide your chest forward, and place both your chest and your chin on the floor.
At this point, you should have eight points touching the floor: your two hands, two feet, two knees, your chest, and your chin.
Step 7: Cobra Pose (Bhujangasana)
From the previous position, push your chest forward and up, creating a slight backbend.
You might want to lift their chin up as high as they will go in this posture, but that’s not totally necessary. Instead, focus on bringing your shoulder blades together so that your chest is open.
Roll your inner thighs together, as if someone is pulling them up and away from the ground. Bring your shoulders away from your ears and allow your neck to gently lengthen.
Step 8: Downward Facing Dog Pose (Adho Mukha Svanasana)
With straight arms pressed into the ground, push your chest backward into a downward-facing dog. Keep your feet and legs hip-width distance apart to give your chest and shoulders some space in this posture.
If this is too tight for your hamstrings, you can bend the knees. Pull your belly button towards your spine and your tailbone toward the ceiling. Keep your fingers spread out wide with all of the small muscle groups in your hands engaged so that your wrists are supported in this pose.
Step 9: Equestrian Pose (Ashwa Sanchalanasana)
From downward-facing dog, bring your right foot forward and place it on the ground between your hands. Drop your left knee to the floor. Press the hips down toward the floor and direct your gaze upward.
Step 10: Standing Forward Bend (Hasta Padasana)
Come back to your standing forward bend and use your core strength to move your chest and belly closer to your legs.
Step 11: Raise Arm Pose (Hasta Uttanasana)
Raise your arms over your head towards the ceiling and stand tall. Be mindful of your shoulders, making sure that they aren’t scrunched up in your ears.
Step 12: Mountain Pose (Tadasana)
Bring your hands together and down toward your chest, giving thanks to this beautiful yoga sequence before settling into the mountain pose. Keep your legs engaged and your arms charged as you stand tall, connected to the Earth beneath you.


 14.12°C Kathmandu